In this tutorial, I’ll show you how to create a fantasy photo manipulation featuring a wonderland with giant mushrooms and butterflies. First, we’ll build the base scene using a sky and ground images. Later, we’ll add the trees, road, castle and blend them together using adjustment layers, masking, and brushes. After that, we’ll add the model, mushrooms, and butterflies. We’ll use several adjustment layers to complete the final effect.
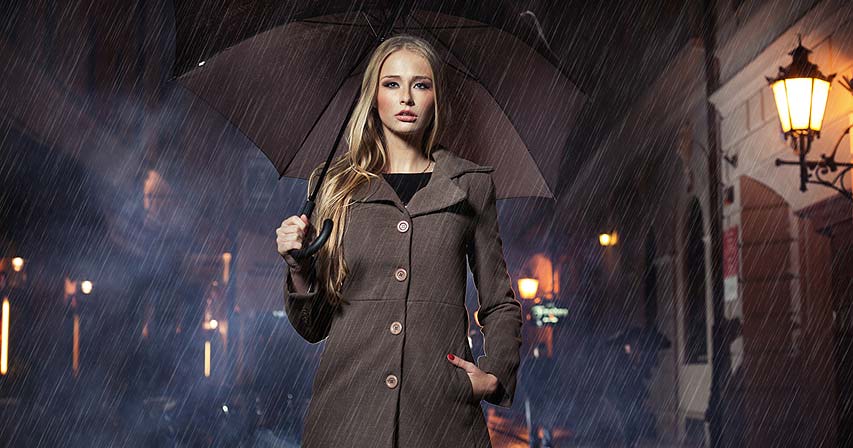
Preview of the Final Result

Tutorial Resources
- Sky
- Castle
- Ground
- Road
- Root
- Trunk
- Fancy trees
- Model
- Mushroom 1
- Mushroom 2
- Mushroom 3
- Mushroom 4
- Butterflies
Step 1
Discover more
Adobe Photoshop
Image editing
photo editing
Photoshop
Special effects tutorials
Digital arts tutorials
Photoshop gradients
Image editing tools
Creative Cloud subscription
Photoshop book reviews
Create a new 2000×1333 px document and fill it with white. Open the ground image and use the Magnetic Lasso Tool (L) to isolate the mossy green and drag it into the white canvas using the Move Tool (V). Place it in the bottom half of the canvas and convert it to a Smart Object.

Step 2
Discover more
Adobe Photoshop
Image editing
Photoshop
photo editing
Photography courses online
Digital painting tutorials
Ergonomic computer mouse
Photo editing presets
Photo retouching service
High-resolution stock photos
Duplicate this layer and set it below the first one. Move it to the right and use the Free Transform Tool (Ctrl+T) to distort this part as shown below.

On each of the ground layers, click the second icon at the bottom of the Layers panel to add a mask to these layers. Activate the Brush Tool (B) and select a hard round one with black color. Use this brush to erase some of details of the ground .

Step 3
Discover more
photo editing
Image editing
Adobe Photoshop
Photoshop
Lightroom preset bundles
Online design communities
Photoshop gradients
Photo manipulation books
Photoshop action packs
Web design templates
On the first ground layer, go to Filter > Blur > Gaussian Blur and set the radius to 6 px. On the filter mask, use a soft black brush to erase the softness on the background and midground, leaving the blur effect visible on the foreground.


Step 4
Discover more
photo editing
Photoshop
Image editing
Adobe Photoshop
Graphic design software alternatives
Ergonomic computer mouse
Creative Cloud subscription
Digital arts tutorials
Lightroom
Best fashion retailers
On each of the ground layers, make a new layer, change the mode to Overlay 100% and fill it with 50% gray.

Activate the Dodge Tool (O with Midtones Range, Exposure about 20-25% to brighten the details on the contour of the ground parts to fit the light on the background (we’ll add it in the next steps). You can see how I did it with Normal mode and the result with Overlay mode.


Step 5
Discover more
Image editing
photo editing
Photoshop
Adobe Photoshop
Texture overlay collections
Surreal photo manipulation
Photo manipulation service
Computer monitors
Photo editing services
High-resolution stock photos
Select the ground layers and the dodge ones and hit Ctrl+G to make a group for them. Change the group mode to Normal 100% and on top of the layers within this group, go to Layer > New Adjustment Layer > Curves and decrease the lightness. On this layer mask, use a soft black brush to erase the dark effect on the right of the background and midground to reveal the lightness there.


Step 6
Discover more
Lightroom
SparkleStock
Photoshop
Image editing tools
Computer monitors
Wacom drawing tablet
Special effects tutorials
Digital arts tutorials
Photoshop action packs
Computer graphics cards
Open the road image and use the Polygonal Lasso Tool to take the road part only and place it above the ground. Flip it horizontally (Edit > Transform > Flip Horizontal) and move it to the right of the ground. Use Ctrl+T to transform the road part a bit.


Step 7
Discover more
External hard drives
Surreal photo manipulation
Special effects tutorials
Lightroom presets
Digital painting tutorials
Creative Cloud subscription
Texture overlay collections
SparkleStock
photo editing
Photoshop addons
Add a mask to this layer and use a hard black brush to remove the hard part of the bottom of the road and leave the top visible on the right, also use a medium-hard brush to blend the road with the ground.

Step 8
Discover more
Adobe Lightroom
Creative Cloud subscription
Surreal photo manipulation
Lightroom presets
Photoshop tutorials
Ergonomic computer mouse
Photo manipulation books
Digital art brushes
Online design communities
Photo manipulation guide
The road looks too dark compared with the background so create a Curves adjustment layer to brighten it. On the layer mask, use a soft black brush to remove the highlight on top of the road so it won’t become too bright.

Step 9
Discover more
Lightroom
SparkleStock
Lightroom presets
Photoshop
Photo manipulation service
Digital arts tutorials
Photoshop brushes
Photoshop actions download
Adobe Photoshop
Photo manipulation guide
Make another Curves adjustment layer to brighten the part near the middle section of the ground a bit. On the layer mask , paint on the rest so it won’t be affected by this adjustment layer.

Step 10
Discover more
Lightroom
Photoshop gradients
Adobe Photoshop
Ergonomic computer mouse
Photoshop addons
Image editing tools
Professional photo retouching
Adobe Photoshop software
Photo editing presets
Web design inspirations
Open the sky image and use the Rectangular Marquee Tool (M) to select the sky part only and place it in the upper half of the canvas. Set this layer below the ground group and flip it horizontally to make its light fit the light on the ground and road. Convert this layer to a Smart Object.

Go to Filter > Noise > Dust & Scratches and fill in the settings below. This step is to soften the sky a bit.

Step 11
Discover more
Best fashion retailers
Digital painting tutorials
Photo manipulation guide
Adobe Lightroom
Computer monitors
Lightroom presets
Photo retouching service
Camera
Image editing
Web design templates
Make a Color Balance adjustment layer to brighten the sky and increase the warm yellow light . Alter the Midtones and Highlights values:


Step 12
Discover more
Lightroom presets
Graphic design resources
Ergonomic computer mouse
Surreal photo manipulation
Digital art brushes
Photo manipulation service
Computer monitors
Texture overlay collections
Photoshop brushes
Professional photo retouching
Open the castle image. As it has a transparent background so just the Move Tool to drag it into our working document and place it in the right of the canvas. Set this layer below the ground group.

Step 13
Discover more
Photo retouching service
Ergonomic computer mouse
Photoshop action packs
Photo editing presets
Photoshop gradients
Photo manipulation service
Photoshop
Web design inspirations
Graphic design software alternatives
Image editing tools
Apply a Gaussian Blur of 3 px to the castle’s layer. This step is to separate the castle with the ground and help to increase the depth of the scene.

Step 14
Discover more
High-resolution stock photos
Creative Cloud subscription
Photoshop brushes
Photo editing presets
Photography courses online
Online design communities
Camera
photo editing
Photoshop gradients
Photo manipulation service
Create a Color Balance adjustment layer to change the castle’s color a little.

Step 15
Discover more
Digital painting tutorials
Wacom drawing tablet
Photo retouching service
Special effects tutorials
Creative Cloud subscription
Photo manipulation guide
Photoshop book reviews
Adobe Photoshop subscription
Photo manipulation service
Photoshop addons
Make a Color Fill layer and pick the color #eecf9f. Lower the opacity of this layer to 40% to give the castle some warm dreamy effect .

Step 16
Discover more
Photo manipulation service
Wacom drawing tablet
photo editing
Photoshop brushes
Digital art brushes
Graphic design software alternatives
Photoshop gradients
Camera
Adobe Lightroom
Photoshop
Add a new layer, change the mode to Overlay 100% and fill with 50% gray. Use the Dodge Tool to paint some light on the castle to fit the light of the sky.

Step 17
Discover more
Digital art brushes
Photo editing services
Computer graphics cards
Best fashion retailers
High-resolution stock photos
Camera
Photoshop actions download
Adobe Lightroom
Online design communities
SparkleStock
Open the tree root image and cut it out from the background. Place it in the left of the ground.

Add a mask to this layer and use soft black brush to remove the hard edges on the top and blend the bottom with the ground.

Step 18
Discover more
Texture overlay collections
Lightroom preset bundles
SparkleStock
Best fashion retailers
Graphic design resources
Image editing
Digital arts tutorials
Photoshop action packs
Photo manipulation books
Adobe Lightroom
Make a Hue/Saturation adjustment layer to change the root’s color a bit. On the layer mask, paint on the hidden side of the root to make it blended better with the ground.

Step 19
Discover more
Graphic design software alternatives
Computer graphics cards
Web design templates
Creative Cloud subscription
Computer monitors
Wacom drawing tablet
External hard drives
Online design communities
Adobe Lightroom
Professional photo retouching
Create a Curves adjustment layer to darken the hidden side of the root. On this layer mask, paint on the contour part of the bottom to reveal the lightness there.

Step 20
Discover more
Photo manipulation books
Ergonomic computer mouse
Web design templates
Texture overlay collections
Photoshop brushes
SparkleStock
Graphic design resources
Adobe Photoshop
Lightroom preset bundles
Lightroom
Make a new layer, change the mode to Overlay and fill with 50% gray. Use the Dodge Tool to paint more light on the contour of the root to make this part brighter.


Step 21
Discover more
Image editing tools
Design tool subscriptions
SparkleStock
Adobe Photoshop subscription
Photoshop action packs
Photo editing services
Photoshop actions download
Online design communities
Photo manipulation service
Adobe Lightroom
Place the tree trunk image above the root one and use Ctrl+T to distort it to fit the position of the root.

Add a mask to this layer and use a hard black brush to remove the background around the trunk and a soft black brush to blend the trunk with the existing root.

Step 22
Discover more
Best fashion retailers
Lightroom presets
Lightroom preset bundles
Photography courses online
Professional photo retouching
Creative Cloud subscription
Computer monitors
Web design templates
Photo retouching service
Image editing tools
Create a Curves adjustment layer to darken the hidden side of the trunk. On the layer mask, paint on the contour of the trunk so it won’t be darkened by this adjustment layer.

Step 23
Discover more
External hard drives
Digital art brushes
Computer monitors
Design tool subscriptions
Photoshop tutorials
Photo manipulation service
Web design templates
Best fashion retailers
Photo manipulation guide
Lightroom
Make a Color Balance adjustment layer to give the trunk some more green.

Step 24
Discover more
Photoshop addons
Adobe Photoshop subscription
Camera
Texture overlay collections
Adobe Photoshop
Digital arts tutorials
SparkleStock
Photo manipulation guide
Photoshop gradients
Photoshop tutorials
Open the fancy trees image and isolate them from the background. Drag them into our main document using the Move Tool and place them along the road. Use Ctrl+T to change their form and sizes a bit to fit the direction of the road.

Step 25
Discover more
Web design templates
Photoshop addons
Digital painting tutorials
Photoshop
Adobe Photoshop
Photoshop book reviews
Design tool subscriptions
Digital art brushes
SparkleStock
Lightroom preset bundles
We’ll make shadow for these trees on the road except the biggest one with shape of heart as its shadow will be hidden from the viewer. Make a new layer below the tree with shape of diamond and hold Ctrl and click its thumbnail layer to load its selection. Fill this selection with the color #1a1a03. Convert this layer to a Smart Object and flip it vertically. Move it below the bottom of the tree and use Ctrl+T to change its form to fit the light’s direction.


Lower the opacity of this layer to 60% and apply a Gaussian Blur of 0.5 px to soften the shadow a little.

Step 26
Discover more
Photoshop
Adobe Photoshop
photo editing
Image editing
Adobe Lightroom
Ergonomic computer mouse
Lightroom preset bundles
Photo manipulation books
Photography courses online
Photoshop actions download
Make shadow for other trees using the same method but don’t apply the Gaussian Blur filter to the shadow of the smallest tree as it’s too thin.
Step 27
Discover more
Image editing
Adobe Photoshop
Photoshop
photo editing
Photo manipulation service
External hard drives
Photoshop actions download
Lightroom presets
Professional photo retouching
Lightroom
Create a group for these trees and change the group’s mode to Normal 100%. Add a Color Balance adjustment layer to give them some more warm yellow.
Step 28
Discover more
photo editing
Image editing
Photoshop
Adobe Photoshop
Photoshop action packs
Photo manipulation books
Photo editing services
SparkleStock
Photoshop gradients
Adobe Photoshop software
Make a Curves adjustment layer to bring more light to the trees. On the layer mask, use a medium- soft black brush to paint on the hidden side of the tree’s top to make a shadow area there.

Create another Curves adjustment layer to give the trees more dreamy light. Paint on the shadow areas so they won’t be affected by this adjustment layer.

Step 29
Discover more
photo editing
Image editing
Adobe Photoshop
Photoshop
Design tool subscriptions
Photoshop action packs
Photography courses online
Texture overlay collections
Professional photo retouching
Camera
Cut out the model and place her in the midground.

Create a new layer below the model one and make shadow for her as done with the trees. I’ve lowered the opacity of the shadow layer to 70% and applied a Gaussian Blur of 1 px to this layer. Also add a mask to this layer to reduce the opacity of the top of the shadow a little.

Step 30
Discover more
photo editing
Image editing
Adobe Photoshop
Photoshop
Photoshop action packs
Photo manipulation service
Lightroom presets
High-resolution stock photos
Photo manipulation books
Special effects tutorials
Make a Hue/Saturation adjustment layer to change the hair’s color a bit. On the layer mask, paint on the skin so it won’t become redder after this step.

Step 31
Discover more
photo editing
Photoshop
Image editing
Adobe Photoshop
Texture overlay collections
Adobe Lightroom
Computer monitors
Photoshop actions download
Computer graphics cards
Web design inspirations
Add a Curves adjustment layer to darken the model a bit.

Step 32
Discover more
Adobe Photoshop
Photoshop
photo editing
Image editing
Adobe Lightroom
Graphic design software alternatives
Web design templates
Digital painting tutorials
Web design inspirations
Photo manipulation service
Open the mushroom 1 image and take the one on the left (from the viewer) to add to the hidden side of the big tree on the left. Add a mask to this layer and use a medium soft black brush to blend its bottom with the ground.

Step 33
Discover more
Adobe Photoshop
Image editing
Photoshop
photo editing
Lightroom presets
Photo editing presets
Wacom drawing tablet
Web design inspirations
Computer monitors
Photo retouching service
Make a Color Balance adjustment layer to make the mushroom more yellow.

Step 34
Discover more
Adobe Photoshop
Photoshop
Image editing
photo editing
Best fashion retailers
Photo manipulation guide
Photo manipulation books
Photoshop tutorials
Graphic design software alternatives
Professional photo retouching
Create a Curves adjustment layer to darken the mushroom as it’s hidden from the light. On the layer mask, use a soft black brush with opacity about 5-10% to reduce the light on the front of the mushroom.

Step 35
Discover more
Photoshop
Adobe Photoshop
Image editing
photo editing
Adobe Photoshop software
Texture overlay collections
Lightroom
Graphic design resources
Digital art brushes
SparkleStock
Add the mushroom 2 to the position besides the mushroom 1 but nearer the background light. Use a layer mask to blend this mushroom with the ground.

Step 36
Discover more
Image editing
photo editing
Adobe Photoshop
Photoshop
Photoshop addons
Photo retouching service
Adobe Photoshop software
Surreal photo manipulation
Digital arts tutorials
Computer monitors
Create a Color Balance adjustment layer and alter the Midtones values.
How to Create a Wonderland Photo Manipulation with Photoshop
—
by
Photo Manipulation Photoshop Tutorials Uncategorized

Step 37
Make a Curves adjustment layer to darken the mushroom. On the layer mask, paint on the top right of the mushroom to reveal some lightness there.

Step 38
Add a new layer, change the mode to Overlay 100% and fill with 50% gray. Use the Burn Tool to darken some details on the top and the stem of the mushroom.

Step 39
Cut out the mushroom 3 from the original background and add it to the right corner of the ground. Use a layer mask to blend the mushroom with the mossy ground.

Make shadow for this mushroom as done with the other elements.

Step 40
Create a Hue/Saturation adjustment layer to reduce the yellow cast of the gills below the cap. On the layer mask, paint on the rest of the mushroom so it won’t be affected by this adjustment layer.

Step 41
Make a Color Balance adjustment layer to change the color of the stem and cap a bit. The selected areas show where to paint on the layer mask.

Step 42
Add a Curves adjustment layer to brighten the left of the mushroom to fit the main light source. Paint on the right to keep its lightness.

Step 43
Make a new layer, change the mode to Overlay 100% and fill with 50% gray. Use the Dodge and Burn Tool to change the light and shadow of the stem.

Step 44
Add the mushroom 4 to our main document after cutting it out from the original image. Duplicate this layer and arrange the mushrooms besides the big mushroom on the right and in the space between the mushrooms 1 and 2. Use a layer mask on each of these mushroom layers to blend them with the existing ground.

Create a new layer below the small mushroom on the right and make shadow for it as done with the others.

Step 45
Make a group for these mushrooms layers and add a Color Balance adjustment layer and alter the Midtones settings. On the layer mask, use a soft black brush with the opacity about 10-15% to reduce the effect on the stem of the mushrooms.

Step 46
Add a Curves adjustment layer to darken the mushrooms. On this layer mask, use a soft black brush with the opacity about 30-40% to reduce the effect on the front of the mushroom as it’s illuminated by the light.

Step 47
Discover more
Digital painting tutorials
Photoshop actions download
Wacom drawing tablet
Photography courses online
Lightroom
Ergonomic computer mouse
External hard drives
Photo retouching service
Web design templates
Web design inspirations
Create a new layer below all of the mushroom layers. Use a soft brush with the color #1a1a03 with the opacity about 40% to paint a soft shadow for the mushrooms on the hidden side on the left.

Step 48
Discover more
Web design inspirations
High-resolution stock photos
Photo manipulation service
Texture overlay collections
Professional photo retouching
Photoshop addons
Graphic design resources
Photo editing services
Photo manipulation guide
Computer graphics cards
Open the butterflies image and take different butterflies to add to the sky area. I’ve added a big one to the foreground and apply a Gaussian Blur of 6 px to it .

Step 49
Discover more
Adobe Lightroom
Photo manipulation books
Lightroom preset bundles
Adobe Photoshop software
Computer graphics cards
Photoshop actions download
Photoshop gradients
Professional photo retouching
Digital art brushes
Photoshop brushes
Apply a Gaussian Blur of 4 px to each of the small butterffy layers in the lower positions.

Step 50
Discover more
Professional photo retouching
Photo retouching service
Photo manipulation guide
Photo manipulation service
Photoshop addons
Photo manipulation books
Photoshop
Photoshop actions download
Web design inspirations
Lightroom presets
Create a Curves adjustment layer for the biggest butterfly to increase the haze on its lower body a bit. On this layer mask, paint on its top to reduce the effect there.

Step 51
Discover more
External hard drives
Surreal photo manipulation
Graphic design software alternatives
Lightroom presets
Creative Cloud subscription
Photoshop brushes
Image editing
Photoshop book reviews
Digital arts tutorials
Photo manipulation service
On each of the smaller butterflies on the sky, make a new Color Fill layer and pick the color #e4d7c2. Lower the opacity of these fill layers to 30% and 35% or any values you feel good.

Step 52
Discover more
Photo retouching service
Photoshop brushes
Wacom drawing tablet
Photography courses online
Computer monitors
Professional photo retouching
Adobe Lightroom
Photoshop action packs
Lightroom preset bundles
Adobe Photoshop subscription
Make a group for the butterfly layers and add a Curves adjustment layer to increase a dreamy effect for them. On the layer mask, use a soft black brush with the opacity about 30-50% to reduce the hazy effect on the one on the foreground and on the wings of the biggest butterfly or any details if needed.

Step 53
Discover more
Online design communities
Photo editing services
Lightroom
Photoshop brushes
Wacom drawing tablet
Image editing
Adobe Lightroom
Digital painting tutorials
Photo manipulation guide
Digital arts tutorials
Create a Gradient Map adjustment layer on top of the layers and pick the colors #480404 and #006020. Lower the opacity of this layer to 20%.

Step 54
Discover more
Texture overlay collections
Ergonomic computer mouse
Photoshop
Photography courses online
Digital arts tutorials
Photoshop book reviews
Adobe Lightroom
Photoshop brushes
Lightroom
SparkleStock
Make a Color Balance adjustment layer and change the Midtones and Highlights settings.


Step 55
Discover more
Computer monitors
Photo editing presets
Photoshop addons
Lightroom preset bundles
Photoshop book reviews
Graphic design resources
Photoshop actions download
Photography courses online
Photo manipulation books
Ergonomic computer mouse
Add a Photo Filter adjustment layer and pick the color #f5c88d.

Step 56
Discover more
Photoshop actions download
Photoshop book reviews
Design tool subscriptions
Ergonomic computer mouse
Adobe Lightroom
Lightroom
Photoshop
Adobe Photoshop
Camera
Creative Cloud subscription
Create a Curves adjustment layer to increase the contrast of the whole scene.

Make a Vibrance adjustment layer to enhance the final effect:

Final Result